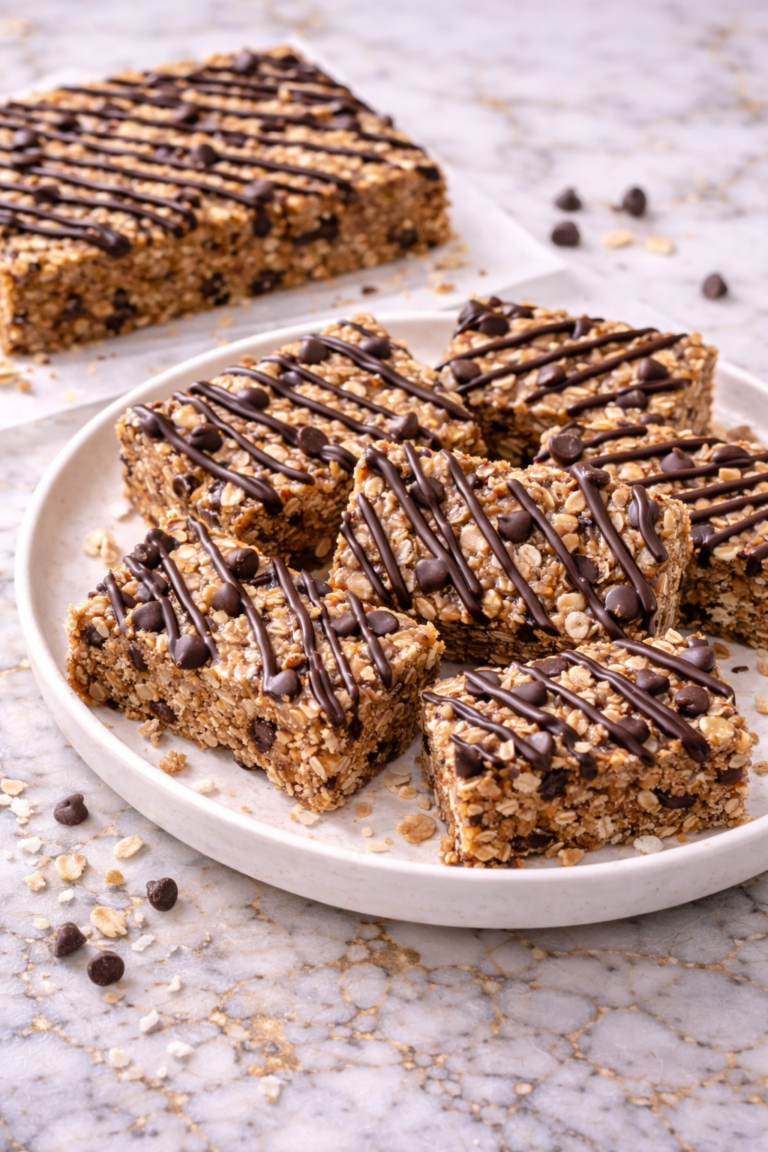
I make these no-bake vegan chocolate peanut butter bars when I need something simple that still feels like a real treat. They come together quickly with ingredients I usually already have, and I don’t have to turn on the oven. I like how they set in the fridge and slice neatly, making them easy to store and serve.
I often rely on this recipe when I want a sweet option that’s both rich and satisfying without being complicated. The peanut butter layer is smooth and balanced, while the chocolate adds just enough contrast. I trust these bars to turn out consistent every time, which makes them a regular in my routine.
Why You’ll Love This Recipe
These no-bake vegan chocolate peanut butter bars are a simple dessert that delivers both flavor and convenience. The peanut butter base is soft and slightly sweet, while the chocolate layer adds a smooth, rich finish. Together, they create a balanced texture that feels satisfying without being overly heavy.
They’re also very easy to prepare, making them a great option for busy days. Since there’s no baking involved, most of the time is spent letting them chill and set. The process is straightforward and doesn’t require any special techniques.
Another reason this recipe works so well is its flexibility. You can adjust the sweetness, change the thickness of the layers, or add toppings if you like. These no-bake vegan chocolate peanut butter bars are easy to customize while keeping the base simple.
Serves: 9–12 bars
This recipe makes about nine to twelve bars, depending on how you slice them. You can cut smaller squares for lighter portions or larger bars for a more filling treat. They also store well for later use.
Ingredients You’ll Need
For the Base Layer
- 1 cup peanut butter
- ¼ cup maple syrup
- 1 tablespoon coconut oil
- 1 cup oats (blended into flour or finely ground)
For the Chocolate Layer
- ½ cup dairy-free chocolate chips
- 1 tablespoon peanut butter
- 1 teaspoon coconut oil
Optional Add-Ins
- Pinch of salt
- Chopped peanuts
- Shredded coconut
Pro Tips
- Use smooth peanut butter for a more even texture. This helps the base layer come together more easily.
- Blend the oats finely so the base holds together well. A coarse texture may make the bars crumbly.
- Press the base firmly into the pan. This helps the bars hold their shape when sliced.
- Melt the chocolate slowly to avoid burning. Stir often for a smooth consistency.
- Let the bars chill long enough to fully set before cutting. This makes slicing cleaner and easier.
- Use a lined pan for easy removal. This helps lift the bars out without breaking them.
Tools You’ll Need
- Mixing bowl
- Food processor or blender (for oats)
- Small saucepan or microwave-safe bowl
- Spatula
- Square pan (8×8 or similar)
- Measuring cups and spoons
Substitutions and Variations
Change the Nut Butter
Use almond butter or cashew butter instead of peanut butter. This keeps the texture similar while offering a different flavor.
Make It Nut-Free
Use sunflower seed butter as a substitute. This keeps the structure while making it suitable for more dietary needs.
Adjust the Sweetness
Use agave or another liquid sweetener instead of maple syrup. This allows you to control the sweetness level.
Add Extra Flavor
Mix in a pinch of cinnamon or vanilla extract. This adds a subtle layer of flavor without changing the base.
Boost the Texture
Add chopped nuts, seeds, or coconut to the base. This gives the bars a bit of crunch.
Make Ahead Tips
I like to make these no-bake vegan chocolate peanut butter bars ahead of time since they need time to chill and set properly. You can prepare them the night before and leave them in the refrigerator overnight. This helps the layers firm up and makes slicing much easier the next day.
If you’re planning further ahead, these bars can also be stored in the freezer. Once fully set, cut them into portions and store them in an airtight container with layers separated by parchment paper. This makes it easy to grab a piece whenever you need a quick treat.
You can also prepare just the base layer in advance and keep it chilled until you’re ready to add the chocolate topping. This helps break the process into smaller steps. It’s a simple way to stay organized while preparing desserts.
Instructions
Step 1: Prepare the Pan
Start by lining a square pan with parchment paper. Make sure the paper extends slightly over the edges so it’s easy to lift the bars out later. This helps with clean removal and easier slicing.
Set the prepared pan aside while you make the base. Having it ready keeps the process smooth. It also prevents the mixture from sitting too long before shaping.
Step 2: Make the Base Mixture
In a mixing bowl, combine the peanut butter, maple syrup, and coconut oil. Stir until the mixture is smooth and well blended. The consistency should be soft and easy to mix.
Add the finely ground oats and mix until everything is fully combined. The mixture should hold together when pressed. If it feels too dry, you can add a small amount of peanut butter.
Step 3: Press the Base into the Pan
Transfer the base mixture into the lined pan. Use a spatula or your hands to press it down firmly and evenly. Make sure the surface is smooth and compact.
Pressing firmly helps the bars hold their shape later. Take your time to spread it evenly across the pan. This step sets the foundation for the final texture.
Step 4: Melt the Chocolate Layer
In a small saucepan or microwave-safe bowl, combine the chocolate chips, peanut butter, and coconut oil. Heat gently, stirring frequently, until the mixture is fully melted and smooth.
Avoid overheating the chocolate, as it can become grainy. Stirring often helps maintain a smooth consistency. Once melted, remove from heat and let it cool slightly.
Step 5: Add the Chocolate Layer
Pour the melted chocolate mixture over the prepared base. Use a spatula to spread it evenly across the surface. Make sure it covers the entire base layer.
Tap the pan lightly on the counter to level the chocolate. This helps create a smooth, even top. Keep the layer consistent for clean slices later.
Step 6: Chill Until Set
Place the pan in the refrigerator and let the bars chill for at least 2 to 3 hours. This allows both layers to firm up completely. Avoid cutting them too early.
If you’re in a hurry, you can place them in the freezer for a shorter time. Just make sure they are fully set before slicing. Proper chilling is key for the right texture.
Step 7: Slice and Serve
Once fully set, lift the bars out of the pan using the parchment paper. Place them on a cutting board and slice into squares or rectangles. Use a sharp knife for clean edges.
Wipe the knife between cuts for a neater finish. Serve the bars chilled or slightly softened at room temperature. They are ready to enjoy with minimal effort.
Serving Suggestions
These no-bake vegan chocolate peanut butter bars work well as a simple dessert or snack. Their rich flavor makes them satisfying in small portions. They’re a practical option for both everyday treats and special occasions.
You can serve them with fresh fruit on the side for a lighter contrast. Berries or sliced bananas pair especially well with the chocolate and peanut butter. This helps balance the richness.
For a slightly more indulgent option, drizzle extra melted chocolate over the top before serving. This adds a bit more depth without extra work. It’s a simple way to enhance presentation.
They also pair well with coffee or tea. The combination of warm and chilled elements works nicely together. This makes them a comfortable option for relaxed moments.
If serving for a group, arrange the bars on a platter for easy sharing. Their clean shape makes them easy to handle. It’s a convenient and appealing presentation.
Leftovers and Storage
I usually store these no-bake vegan chocolate peanut butter bars in an airtight container in the refrigerator. They keep well for up to one week without losing their texture. Keeping them chilled helps maintain their firmness.
For longer storage, you can freeze the bars in a freezer-safe container. Place parchment paper between layers to prevent sticking. This makes it easy to store multiple portions.
When ready to eat, let frozen bars thaw in the refrigerator or at room temperature for a few minutes. This helps soften them slightly. Avoid microwaving, as it can affect the texture.
Keeping them properly stored ensures they stay fresh and enjoyable. They’re easy to make ahead and keep on hand. This makes them a reliable option for quick treats.
Nutrition and Benefits
- These no-bake vegan chocolate peanut butter bars provide healthy fats from peanut butter and coconut oil, which help create a satisfying and rich texture. They are a balanced dessert option when enjoyed in moderation.
- Oats add fiber and help give the bars structure, making them more filling than many traditional desserts. They also contribute to the overall texture.
- Using maple syrup as a sweetener keeps the ingredient list simple and natural. It also allows you to control the sweetness level.
- The recipe is dairy-free and can be adjusted for different dietary needs. This makes it a flexible option for a variety of preferences.
- The combination of ingredients creates a dessert that feels indulgent while still being easy to prepare at home.
Recipe FAQ
Can I use crunchy peanut butter instead of smooth?
Yes, you can use crunchy peanut butter if you prefer added texture. It will create a slightly different consistency. Both options work well.
How do I keep the bars from falling apart?
Make sure to press the base firmly into the pan and chill long enough. This helps the bars hold together. Proper setting is important.
Can I make these gluten-free?
Yes, just make sure to use certified gluten-free oats. The rest of the ingredients are naturally gluten-free. This keeps the recipe suitable for more diets.
Can I use store-bought oat flour?
Yes, store-bought oat flour works just as well. It saves time and keeps the texture consistent. Measure it the same way.
How thick should the layers be?
You can adjust the thickness based on your preference. A slightly thicker base will make the bars more filling. Keep the layers even for best results.
Can I add protein powder?
Yes, you can mix a small amount into the base layer. You may need to adjust the liquid slightly. Blend well to keep the texture smooth.
Can I double the recipe?
Yes, you can double the ingredients and use a larger pan. This is helpful for making bigger batches. Just ensure even spreading for consistent results.
A Simple Treat You’ll Want to Keep on Hand
These no-bake vegan chocolate peanut butter bars are a dependable option when you want something simple, rich, and easy to prepare. They come together with minimal effort and deliver a balanced combination of texture and flavor that feels satisfying without being complicated.
They’re a flexible treat that works for snacks, desserts, or quick bites throughout the week. With their easy preparation and consistent results, they’re a recipe you can return to often. It’s the kind of sweet option that fits naturally into your routine.