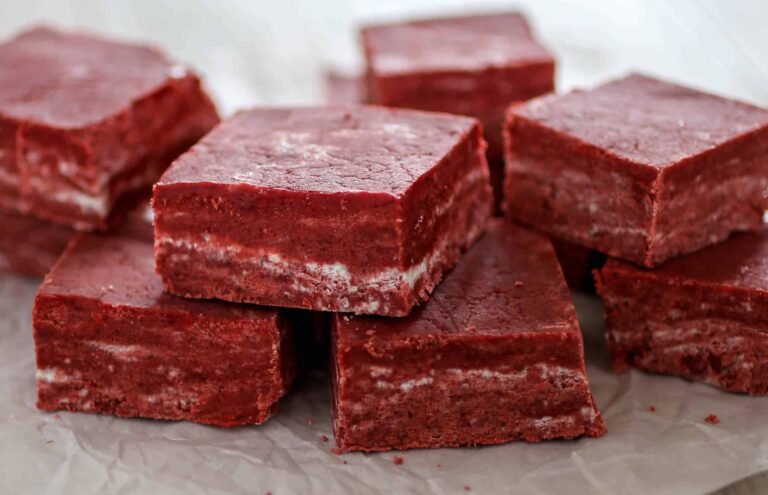
I started making this No-Bake Vegan Peanut Butter Fudge on busy weekends when I wanted a quick homemade treat without turning on the oven.
The creamy peanut butter flavor and soft fudge texture make it feel comforting and rich while still being simple enough to prepare with just a handful of pantry ingredients.
This fudge has become one of the easiest desserts to keep in the refrigerator because it stores well and slices neatly for snacks, lunch boxes, or quick desserts after dinner.
The smooth texture and balanced sweetness make it popular with both kids and adults in my house, especially during busy weeks when everyone wants something homemade and easy to grab.
Why You’ll Love This Recipe
This peanut butter fudge is creamy, rich, and satisfying without needing complicated steps or special baking equipment. Since it is completely no-bake, the recipe stays approachable for beginners and works especially well on warm days when using the oven feels like too much work.
I also love how flexible the recipe can be depending on what ingredients you already have at home. You can make the fudge sweeter, add texture, or adjust the flavor slightly while still keeping the same soft peanut butter center that makes these squares so comforting.
Another reason this recipe works so well is how easy it is to store and prepare ahead for busy weeks. The fudge stays firm in the refrigerator, freezes beautifully, and slices into small portions that are perfect for snacks, dessert trays, or little homemade treats during the day.
Serves: 12 people
This recipe makes about 12 medium fudge squares depending on how large you slice them. You can also cut the fudge into smaller bite-sized pieces for parties, snack boards, or quick lunch box treats.
Ingredients You’ll Need
Peanut Butter Fudge Base
- 1 cup creamy natural peanut butter
- 1/2 cup coconut oil, melted
- 1/3 cup maple syrup
- 1 teaspoon vanilla extract
- 1/4 teaspoon sea salt
- 1 1/2 cups oat flour
Chocolate Topping
- 3/4 cup dairy-free chocolate chips
- 1 tablespoon coconut oil
Optional Toppings
- Chopped peanuts
- Flaky sea salt
- Mini dairy-free chocolate chips
- Crushed pretzels
- Shredded coconut
Pro Tips
- Use natural creamy peanut butter with a smooth texture for the best consistency because thick or dry peanut butter can make the fudge crumbly. Stir the peanut butter well before measuring to keep the mixture balanced.
- Let the melted coconut oil cool slightly before mixing it with the peanut butter so the texture stays smooth and creamy. Very hot oil can make the mixture separate instead of blending evenly.
- Press the fudge mixture firmly into the pan using the back of a spoon or spatula so the squares slice neatly later. Taking an extra minute during this step helps create smoother edges and cleaner pieces.
- Chill the peanut butter layer before adding the chocolate topping so the layers stay more defined and easier to slice after setting. This also helps prevent the warm chocolate from mixing into the fudge layer.
- Let kids help sprinkle toppings like chopped peanuts or mini chocolate chips over the fudge before chilling because it is a simple and fun kitchen task. This recipe works especially well for family cooking since there is no baking involved.
- Use a sharp knife wiped clean between cuts when slicing the fudge. Clean cuts help the chocolate topping stay smooth and keep the pieces looking neat for serving or storing.
Tools You’ll Need
- Mixing bowls
- Measuring cups and spoons
- Silicone spatula or mixing spoon
- 8×8-inch baking dish or pan
- Parchment paper
- Microwave-safe bowl or double boiler
- Sharp knife
- Airtight storage container
Substitutions and Variations
Make It Nut-Free
Use sunflower seed butter instead of peanut butter for a nut-free version. The fudge will still stay creamy and rich with a slightly different flavor that works well with chocolate.
Boost the Chocolate Flavor
Add a tablespoon of cocoa powder to the peanut butter layer for a deeper chocolate flavor throughout the fudge. This creates a richer dessert while keeping the smooth texture.
Change the Nut Butter
Swap the peanut butter for almond butter or cashew butter if preferred. Each option creates a slightly different flavor while still keeping the fudge creamy and easy to slice.
Add More Texture
Mix chopped peanuts, crushed pretzels, or hemp seeds into the fudge layer before chilling. These additions create extra crunch and make the fudge feel a little heartier for snacks.
Make It Sweeter or Lighter
Add a little extra maple syrup for a sweeter dessert-style fudge, or reduce the sweetener slightly for a more balanced everyday snack version. Both options still keep the creamy peanut butter texture that makes this recipe so comforting.
Make Ahead Tips
This No-Bake Vegan Peanut Butter Fudge is one of the easiest desserts to prepare ahead because it needs time to chill before slicing. I usually make it the night before serving so the texture becomes firmer and the peanut butter flavor settles into the fudge more evenly.
You can also prepare the peanut butter layer several hours ahead and refrigerate it before adding the chocolate topping. Splitting the recipe into smaller steps can make the process feel easier during busy afternoons or holiday baking seasons.
The finished fudge stores beautifully in the refrigerator for several days without losing its creamy texture. Keeping a batch chilled and ready makes it easy to grab a quick homemade snack or dessert throughout the week.
This fudge also freezes very well for longer storage. Slice it into squares before freezing and place parchment paper between layers so individual pieces stay easy to remove whenever you want a quick treat.
Instructions
Step 1: Prepare the Pan
Line an 8×8-inch baking pan or dish with parchment paper, leaving extra paper hanging over the edges for easy lifting later. This helps the fudge release cleanly and makes slicing much easier after chilling.
Step 2: Mix the Peanut Butter Base
Add the creamy peanut butter, melted coconut oil, maple syrup, vanilla extract, and sea salt to a large mixing bowl. Stir until the mixture becomes smooth, glossy, and evenly combined without any oily separation.
Step 3: Add the Oat Flour
Gradually stir the oat flour into the peanut butter mixture until a thick and soft dough forms. The mixture should feel smooth and slightly firm but still easy to spread into the pan.
Step 4: Press the Mixture into the Pan
Transfer the peanut butter mixture into the prepared pan and spread it into an even layer using a spatula or the back of a spoon. Press down firmly so the fudge holds together neatly after chilling and slicing.
Step 5: Chill the Base Layer
Place the pan in the refrigerator for about 20 to 30 minutes so the peanut butter layer can firm up slightly before adding the chocolate topping. Chilling at this stage helps create cleaner layers and smoother slices later.
Step 6: Melt the Chocolate Topping
Add the dairy-free chocolate chips and coconut oil to a microwave-safe bowl or double boiler. Heat gently, stirring often, until the chocolate becomes smooth and fully melted without overheating.
Step 7: Add the Chocolate Layer
Pour the melted chocolate over the chilled peanut butter layer and spread it evenly across the surface. Sprinkle on any optional toppings like chopped peanuts, flaky sea salt, or mini chocolate chips before the chocolate sets.
Step 8: Chill Until Firm
Return the pan to the refrigerator for at least 2 hours or until the fudge feels firm and fully set. Once chilled, lift the fudge out using the parchment paper and slice it into squares before serving.
Serving Suggestions
This peanut butter fudge tastes especially good served chilled straight from the refrigerator with coffee, tea, or a glass of oat milk. The creamy peanut butter layer and rich chocolate topping pair nicely with simple drinks that balance the sweetness.
I also like cutting the fudge into small squares for lunch boxes or afternoon snack trays during busy weeks. The pieces stay firm when chilled and feel like an easy homemade treat without requiring much preparation.
For dessert platters or holiday gatherings, arrange the fudge on a serving tray with fresh strawberries, banana slices, or roasted nuts. The fresh fruit and crunchy toppings balance the creamy texture beautifully.
You can also crumble small pieces over dairy-free yogurt or oatmeal for extra sweetness and texture. This works especially well for breakfast when you want something a little more comforting without extra cooking.
These fudge squares are helpful for meal prep because they can be portioned ahead and stored individually for quick snacks. Keeping a batch ready in the refrigerator makes homemade desserts feel much more convenient during busy days.
If you want a richer dessert, drizzle the fudge lightly with warm peanut butter or melted dairy-free chocolate before serving. The extra topping creates an even creamier texture while still keeping the recipe simple and comforting.
Leftovers and Storage
Store the peanut butter fudge in an airtight container in the refrigerator to keep the texture firm and creamy. I like placing parchment paper between layers because it prevents the chocolate topping from sticking and keeps the squares looking neat when serving later.
This fudge stays fresh in the refrigerator for up to one week, making it excellent for meal prep desserts or quick homemade snacks throughout busy days. The flavor often becomes even richer after the first day as the peanut butter and chocolate layers settle together.
For longer storage, freeze the sliced fudge in a freezer-safe container for up to three months. Let the pieces freeze in a single layer first before stacking them so the chocolate topping stays smooth and does not crack too much.
When ready to enjoy, thaw the fudge in the refrigerator or leave it at room temperature for about 10 minutes. The texture softens slightly while still staying creamy and firm enough to hold its shape well.
Avoid leaving the fudge out in warm kitchens for too long because the coconut oil softens quickly at room temperature. Keeping it chilled helps preserve the best texture and appearance for serving.
Nutrition and Benefits
- Peanut butter provides plant-based protein and healthy fats that help make this fudge satisfying and filling for snacks or desserts.
- Oat flour adds texture and fiber while helping create a soft and stable fudge base without needing baked ingredients.
- Maple syrup naturally sweetens the fudge while blending smoothly into the peanut butter mixture without making it overly sugary.
- Dairy-free chocolate chips keep the recipe completely vegan while still adding a rich and comforting chocolate flavor.
- Since this recipe is completely no-bake, it stays simple and convenient while still creating a homemade dessert that feels special and satisfying.
Recipe FAQ
Can I use crunchy peanut butter instead of creamy?
Yes, crunchy peanut butter works well if you want extra texture in the fudge. The finished squares will have small peanut pieces throughout, which can make the texture feel a little heartier. Stir the peanut butter well before measuring for the best consistency.
Can I freeze the fudge?
Yes, this fudge freezes very well for longer storage. Place parchment paper between layers and store the pieces in a freezer-safe container. Let the squares soften slightly before serving for the best creamy texture.
Why is my fudge too soft?
Soft fudge is usually caused by not chilling long enough or using peanut butter that contains too much oil. Make sure the fudge chills fully before slicing and measure the coconut oil carefully for the best texture.
Can I make this recipe gluten-free?
Yes, simply use certified gluten-free oat flour to keep the recipe fully gluten-free. Most of the ingredients are naturally gluten-free already, but checking labels carefully is always helpful for sensitive diets.
Can I use another sweetener?
Agave syrup or date syrup can work instead of maple syrup if needed. The flavor may change slightly depending on the sweetener used, but the fudge should still stay creamy and smooth.
How do I slice the fudge neatly?
Use a sharp knife and wipe it clean between cuts to keep the layers smooth and tidy. Chilling the fudge completely before slicing also helps prevent messy edges and cracking.
Is this good for meal prep?
Yes, this fudge is excellent for meal prep because it stores well and can be portioned ahead into small squares. Keeping a batch chilled and ready makes quick snacks and desserts much easier during busy weeks.
A Creamy Peanut Butter Treat Worth Keeping on Hand
This No-Bake Vegan Peanut Butter Fudge is the kind of simple homemade dessert that makes busy days feel a little more comforting. The creamy peanut butter layer, rich chocolate topping, and easy no-bake preparation make it dependable for everything from lunch box treats to quick family desserts.
I love that it can be prepared ahead, stored easily, and enjoyed straight from the refrigerator whenever something sweet sounds good. Keeping a batch chilled and ready during the week makes homemade snacks feel simple, practical, and satisfying without requiring much extra effort.