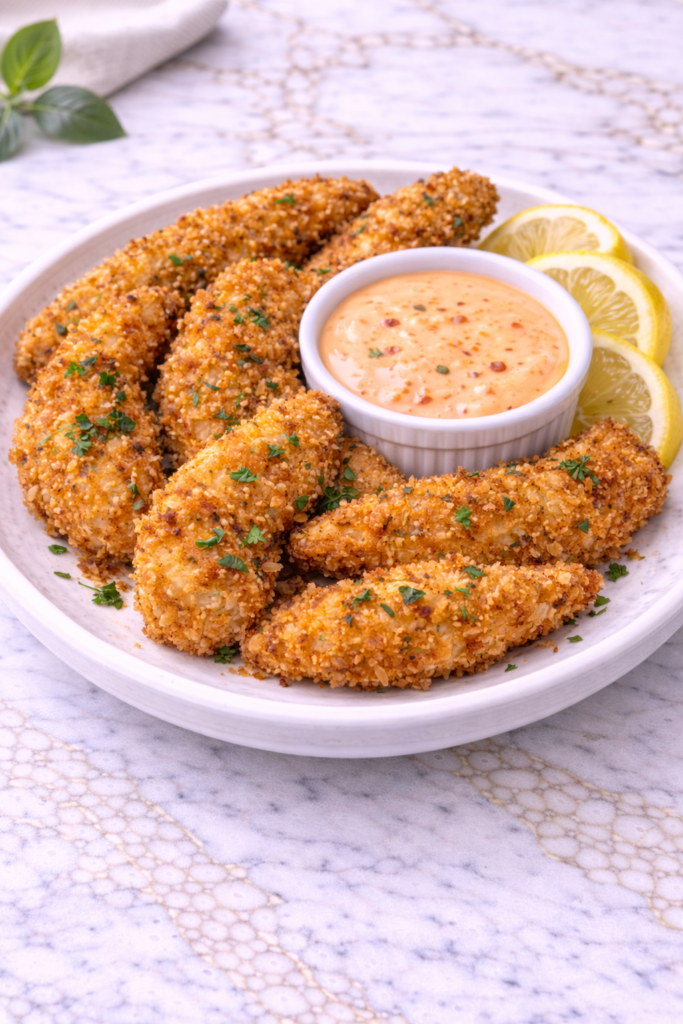
I make air fryer chicken tenders when I want something crispy and satisfying that kids and adults both eat without hesitation. The air fryer gets the breading golden and crunchy in about twelve minutes without any oil or mess from deep frying.
I’ll show you how to set up a simple breading station and season the coating so the tenders actually have flavor, not just crunch.
While they cook, you can throw together a quick dipping sauce that takes them from basic to something worth making again. They work for a weeknight dinner, a party snack, or whenever you need something crowd-pleasing without much effort.

Why You’ll Love This Recipe
These air fryer chicken tenders deliver the perfect balance of crispy coating and juicy interior without the need for excess oil. The air fryer creates a golden, crunchy texture that rivals traditional frying while keeping things lighter and easier to manage.
They’re also incredibly convenient and quick to prepare, making them ideal for families with tight schedules. With just a few simple ingredients and minimal prep, you can have a meal on the table in under 30 minutes.
Another reason this recipe stands out is its versatility. The tenders pair well with a variety of dipping sauces and sides, making them easy to customize based on your family’s preferences.
Serves: 4 people
This recipe comfortably serves four people, making it perfect for a family dinner or a small gathering. You can easily double the batch if needed, especially since leftovers are just as delicious the next day.
Ingredients You’ll Need
For the Chicken Tenders:
- 1 1/2 pounds chicken tenders
- 1 cup all-purpose flour
- 2 large eggs
- 2 tablespoons milk
- 1 1/2 cups breadcrumbs (panko preferred)
- 1/2 cup grated Parmesan cheese
- 1 teaspoon garlic powder
- 1 teaspoon paprika
- 1/2 teaspoon salt
- 1/2 teaspoon black pepper
- Cooking spray
For the Dipping Sauce:
- 1/2 cup mayonnaise
- 2 tablespoons ketchup
- 1 tablespoon honey
- 1 teaspoon Dijon mustard
- 1/2 teaspoon garlic powder
Pro Tips
Pat the chicken tenders dry before breading to help the coating stick better. Removing excess moisture creates a crispier, more even crust when air frying.
Set up a breading station with flour, egg mixture, and breadcrumbs to keep the process organized. This makes coating each tender quicker and less messy, especially when cooking with kids.
Don’t overcrowd the air fryer basket, as this can prevent proper airflow and lead to uneven cooking. Cooking in batches ensures each piece gets perfectly crispy.
Lightly spray the breaded tenders with cooking spray before air frying. This helps achieve that golden, fried-like finish without needing excess oil.
Flip the tenders halfway through cooking to ensure even browning on both sides. This simple step makes a noticeable difference in texture and appearance.
Let the tenders rest for a few minutes after cooking before serving. This helps the coating set and keeps the juices locked inside.
Tools You’ll Need
- Air fryer
- Three shallow bowls
- Whisk
- Tongs
- Measuring cups and spoons
- Plate or tray
- Paper towels
Substitutions and Variations
You can swap all-purpose flour with a gluten-free alternative if needed. Pair it with gluten-free breadcrumbs to make the entire recipe suitable for gluten-sensitive diets.
If you prefer a different flavor profile, try adding Italian seasoning, cayenne pepper, or smoked paprika to the breadcrumb mixture. This allows you to adjust the taste without changing the core recipe.
For a lighter option, you can skip the Parmesan cheese or reduce the amount slightly. The tenders will still be flavorful while cutting back on richness.
Chicken breasts cut into strips can be used in place of pre-cut tenders. This is a great option if you already have chicken on hand and want to save a trip to the store.
The dipping sauce can also be customized to your liking. You can add a splash of hot sauce for heat or substitute Greek yogurt for part of the mayonnaise for a lighter version.
Make Ahead Tips
These chicken tenders are easy to prepare in advance, which makes them especially helpful for busy schedules. You can bread the chicken a few hours ahead of time and store the coated tenders on a tray in the refrigerator until you’re ready to cook.
For even more convenience, you can fully bread and freeze the tenders in a single layer before transferring them to a freezer-safe bag. This allows you to cook them straight from frozen, adding just a few extra minutes to the air frying time.
The dipping sauce can also be made ahead and stored in the refrigerator for up to three days. In fact, letting it sit for a few hours helps the flavors blend together even more.
Instructions
Step 1: Prepare the Breading Station
Set up three shallow bowls for the breading process. In the first bowl, add the flour; in the second, whisk together the eggs and milk; and in the third, combine the breadcrumbs, Parmesan cheese, garlic powder, paprika, salt, and pepper.
Step 2: Coat the Chicken
Take each chicken tender and dredge it in the flour, making sure it is fully coated. Dip it into the egg mixture, then press it into the breadcrumb mixture until evenly coated on all sides.
Step 3: Preheat the Air Fryer
Preheat your air fryer to 400°F for about 3–5 minutes. This step helps the tenders start cooking immediately and improves the overall crispiness.
Step 4: Arrange the Tenders
Lightly spray the air fryer basket with cooking spray and place the breaded tenders in a single layer. Make sure there is space between each piece to allow proper air circulation.
Step 5: Air Fry the Chicken
Spray the tops of the tenders lightly with cooking spray and cook for 8–10 minutes. Flip the tenders halfway through cooking and continue until they are golden brown and cooked through.
Step 6: Check for Doneness
Ensure the internal temperature reaches 165°F using a meat thermometer. The outside should be crisp and golden, while the inside remains juicy and tender.
Step 7: Make the Dipping Sauce
In a small bowl, combine the mayonnaise, ketchup, honey, Dijon mustard, and garlic powder. Stir until smooth and well blended, then refrigerate until ready to serve.
Step 8: Serve and Enjoy
Remove the tenders from the air fryer and let them rest for a few minutes. Serve warm with the dipping sauce on the side for the best flavor and texture.
Serving Suggestions
These chicken tenders are perfect served fresh and hot with the dipping sauce on the side. The crispy coating and creamy, slightly sweet sauce create a satisfying combination that works well for both kids and adults.
They pair nicely with classic sides like French fries, sweet potato fries, or even a simple side of roasted potatoes. This creates a familiar, comforting meal that feels both fun and filling.
For a lighter option, serve the tenders with a fresh salad or sliced vegetables like cucumbers, carrots, and cherry tomatoes. The crisp, refreshing sides balance the richness of the chicken.
You can also turn these tenders into wraps or sandwiches by adding lettuce, tomato, and a drizzle of sauce. This adds variety and makes the meal feel a little more customized.
If you’re serving a group, consider offering a variety of dipping sauces such as barbecue, ranch, or honey mustard. This allows everyone to choose their favorite flavor combination.
They also work well as a party appetizer or game-day snack when served in smaller portions. Simply arrange them on a platter with multiple sauces for easy sharing.
Leftovers and Storage
Store any leftover chicken tenders in an airtight container in the refrigerator for up to three days. Make sure they are completely cooled before storing to maintain their texture.
To reheat, place the tenders back in the air fryer at 350°F for a few minutes until warmed through. This helps restore their crispiness much better than using a microwave.
If using a microwave, reheat in short intervals to avoid overcooking. While convenient, this method may soften the coating slightly.
For longer storage, you can freeze cooked tenders in a freezer-safe container for up to two months. Reheat them directly from frozen in the air fryer for best results.
Store the dipping sauce separately in the refrigerator in a sealed container. Stir before serving to maintain a smooth consistency.
Nutrition and Benefits
- Chicken tenders provide a good source of lean protein, helping to keep meals filling and satisfying.
- Air frying significantly reduces the amount of oil used compared to traditional frying methods.
- The recipe can be adjusted to include whole wheat or gluten-free breadcrumbs for added flexibility.
- Homemade dipping sauce allows better control over ingredients and reduces preservatives found in store-bought options.
- Pairing with fresh vegetables or salads can turn this into a balanced, wholesome meal for families.
Recipe FAQ
Can I use chicken breasts instead of tenders?
Yes, you can slice chicken breasts into strips and use them in place of tenders. Just try to keep the pieces similar in size for even cooking.
How do I make the tenders extra crispy?
Using panko breadcrumbs and lightly spraying the tenders with cooking spray helps achieve a crisp texture. Cooking in a single layer without overcrowding also makes a big difference.
Can I bake these instead of air frying?
Yes, you can bake them in a preheated oven at 425°F for about 18–20 minutes. Flip them halfway through to ensure even browning.
What if I don’t have Parmesan cheese?
You can skip the Parmesan or replace it with another finely grated cheese. The tenders will still turn out flavorful and crispy.
Can I make this recipe dairy-free?
Yes, substitute the milk with a dairy-free alternative and omit or replace the Parmesan cheese. The results will still be delicious.
How do I keep the coating from falling off?
Make sure to press the breadcrumbs firmly onto the chicken and allow the coated tenders to rest briefly before cooking. This helps the coating adhere better.
Is this recipe kid-friendly?
This recipe is very kid-friendly thanks to its mild flavor and crispy texture. You can also adjust the seasoning to suit your family’s preferences.
Conclusion
Air Fryer Chicken Tenders with Dipping Sauce is a simple and reliable recipe that brings crispy, satisfying results without the hassle of deep frying. It’s an easy way to serve a meal that feels both comforting and fun while keeping preparation straightforward.
With its family-friendly appeal and flexible serving options, this recipe quickly becomes a regular favorite. It’s one you can count on for consistent results, making it well worth preparing again and again.