I like making these almond date bars when I want something simple that doesn’t require turning on the oven. They come together quickly, and the ingredients are easy to keep on hand.
The texture is soft but holds its shape well, which makes them convenient for snacks. It’s one of those recipes I rely on when I want something steady and practical.
I started making these as a dairy-free option for quick energy bites during busy days. Over time, they became a regular part of my routine because they store well and are easy to prepare ahead.
The natural sweetness from the dates makes them feel satisfying without being too heavy. It’s now a recipe I come back to often for simple homemade snacks.
Why You’ll Love This Recipe
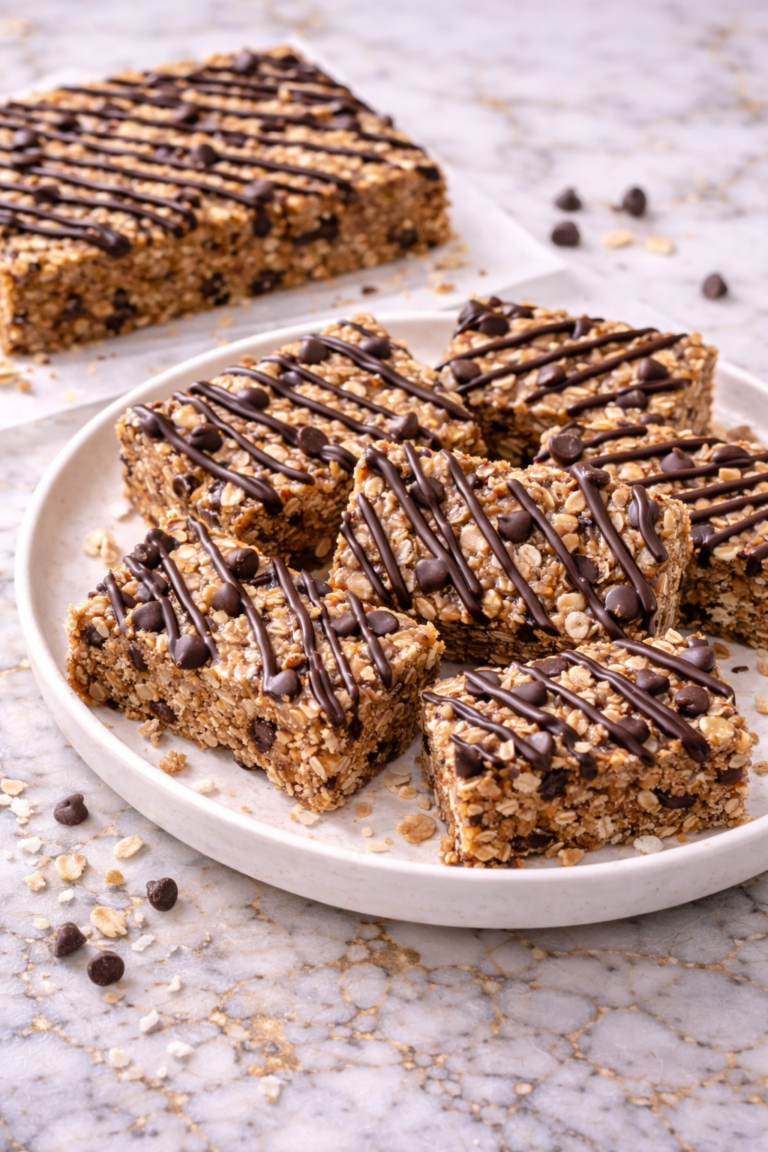
These No-Bake Vegan Almond Date Bars have a soft, chewy texture with a naturally sweet flavor that comes mostly from the dates. The almonds add a gentle crunch that balances the softness of the base. It’s a simple combination that feels satisfying without needing extra ingredients.
They are also very easy to prepare, even if you don’t spend much time in the kitchen. There’s no baking involved, and the steps are straightforward. Everything comes together in a few simple stages.
This recipe is flexible and can be adjusted based on your preferences. You can add different mix-ins or adjust the sweetness while keeping the base the same. It’s a family-friendly option that works well for snacks or light treats.
Serves: 10–12 bars
This recipe makes about ten to twelve bars, depending on how you cut them. You can adjust the size to make smaller snack portions if needed. They store well, making them practical for meal prep.
Ingredients You’ll Need
- 2 cups pitted dates
- 1 cup raw almonds
- 1/2 cup rolled oats
- 1/4 cup almond butter
- 1 teaspoon vanilla extract
- 1/4 teaspoon salt
- 1–2 tablespoons water (if needed for blending)
Pro Tips
- Use soft, fresh dates for the best texture. If they are dry, soak them in warm water for a few minutes before blending.
- Process the mixture just enough to bring it together. Overprocessing can make the texture too smooth.
- Press the mixture firmly into the pan to help the bars hold their shape. This step is important for clean slicing.
- Line your pan with parchment paper for easy removal. This prevents sticking and makes cleanup easier.
- Chill the bars long enough before cutting. This helps them firm up properly.
- Use a sharp knife for clean slices after chilling.
Tools You’ll Need
- Food processor
- Mixing bowl (optional)
- Measuring cups and spoons
- Spatula
- Square or rectangular pan
- Parchment paper
Substitutions and Variations
Swap the Nuts
Use walnuts, cashews, or pecans instead of almonds. This changes the flavor while keeping the same structure.
Add More Flavor
Include a pinch of cinnamon or cocoa powder. These additions can enhance the natural sweetness.
Make It Sweeter
Add a small amount of maple syrup if you prefer a sweeter bar. Adjust gradually.
Boost the Texture
Add chocolate chips, seeds, or shredded coconut. This creates more variety in each bite.
Make It Lighter
Use fewer nuts and more oats for a softer texture. This keeps the bars simple while reducing richness.
Make Ahead Tips
These almond date bars are ideal for making ahead, which makes them especially useful for busy weeks or planned snacks. You can prepare the full batch and store it in the refrigerator for several days. This helps keep them firm and ready to eat whenever you need them.
If you prefer to prep in stages, you can process the dry ingredients and store them separately from the dates and almond butter mixture. When you’re ready, simply combine everything and press it into the pan. This can make the process feel more manageable.
For longer storage, these bars freeze very well. Wrap them individually or store them in a freezer-safe container. This allows you to take out only what you need without defrosting the whole batch.
Instructions
Step 1: Prepare the Pan
Line a square or rectangular pan with parchment paper, leaving some overhang on the sides. This makes it easier to lift the bars out later. Set the pan aside while you prepare the mixture.
Step 2: Blend the Almonds and Oats
Add the raw almonds and rolled oats to a food processor. Pulse until they are broken down into a coarse, crumb-like texture. Be careful not to overprocess into a fine flour.
Step 3: Add the Dates
Add the pitted dates to the food processor with the almond and oat mixture. Blend until the mixture starts to clump together. If needed, add a small amount of water to help it come together.
Step 4: Add Remaining Ingredients
Add the almond butter, vanilla extract, and salt to the mixture. Process again until everything is fully combined and sticky. The mixture should hold together when pressed.
Step 5: Press into the Pan
Transfer the mixture into the prepared pan. Use a spatula or your hands to press it down firmly and evenly. Make sure it is compact so the bars hold their shape.
Step 6: Chill and Set
Place the pan in the refrigerator for at least 1 to 2 hours. This allows the bars to firm up and makes them easier to cut. The longer they chill, the better they hold together.
Step 7: Slice and Serve
Once firm, lift the mixture out of the pan using the parchment paper. Place it on a cutting board and slice into bars or squares. Serve chilled or at room temperature.
Serving Suggestions
These bars are easy to serve as a quick snack on their own. Their natural sweetness makes them satisfying without needing any extra additions. They work well for simple, everyday snacking.
You can also pair them with fruit like apple slices or banana for a more complete snack. This adds freshness and balances the chewy texture of the bars. It’s a simple way to make them more filling.
For a slightly richer option, serve them with a small spoon of nut butter or a drizzle of melted chocolate. These additions enhance the flavor without changing the base recipe. It’s an easy way to customize each serving.
These bars also work well as part of a lunchbox or packed snack. They hold their shape and don’t require refrigeration for short periods. This makes them convenient for on-the-go eating.
You can also crumble them over plant-based yogurt or oatmeal for added texture. This turns them into a topping instead of a standalone snack. It’s a flexible way to use leftovers.
Leftovers and Storage
Store the bars in an airtight container in the refrigerator for up to one week. Keeping them chilled helps maintain their firmness and texture. They are best enjoyed slightly cool.
For longer storage, freeze the bars in a sealed container or wrap them individually. They can be stored in the freezer for up to two months. This makes it easy to keep a batch on hand.
When ready to eat, let frozen bars sit at room temperature for a few minutes. This helps soften them slightly. They will still hold their shape well.
Avoid leaving the bars at room temperature for long periods, especially in warm conditions. The texture may become softer over time. Keeping them cool ensures the best consistency.
If stacking bars, place parchment paper between layers. This prevents them from sticking together. It also makes storage more organized.
Nutrition and Benefits
- These bars are completely dairy-free and vegan, making them suitable for a variety of dietary needs. They offer a simple alternative to processed snacks.
- Dates provide natural sweetness along with fiber and minerals. They help bind the bars while adding flavor.
- Almonds contribute healthy fats and a light crunch. They help make the bars more satisfying and filling.
- The ingredient list is simple and minimally processed, making this recipe easy to prepare at home. It doesn’t require baking or special equipment.
- Compared to many packaged snack bars, this version allows better control over sweetness and ingredients. It’s a practical option for everyday use.
Recipe FAQ
Can I use different nuts?
Yes, you can use walnuts, cashews, or pecans instead of almonds. Each will change the flavor slightly but still work well. Choose based on preference.
What if my mixture is too dry?
If the mixture doesn’t stick together, add a small amount of water or extra almond butter. Blend again until it holds. Add slowly to avoid making it too wet.
What if my mixture is too sticky?
If it feels too sticky, add a small amount of oats or ground nuts. This helps balance the texture. Adjust gradually.
Can I make these without a food processor?
Yes, but it will take more effort. You can finely chop the ingredients and mix by hand. The texture may be slightly different.
Can I reduce the sweetness?
Yes, you can use fewer dates or add more oats and nuts. This will reduce the natural sweetness. Adjust based on taste.
Can I add flavorings?
You can add cinnamon, cocoa powder, or even a pinch of sea salt. These additions enhance the flavor without changing the structure. Keep amounts small.
Are these good for meal prep?
Yes, they store well and are easy to portion ahead. Keeping them in the refrigerator or freezer makes them convenient. They’re a practical snack option.
A Simple Snack You’ll Keep Making
These no-bake vegan almond date bars are one of those recipes that fit easily into everyday routines without much effort. The soft, chewy texture and natural sweetness make them a reliable option for quick snacks or light treats.
They’re easy to prepare, store well, and flexible enough to adjust based on what you have available. With consistent results and simple ingredients, they’re the kind of snack you’ll come back to whenever you want something steady, homemade, and easy to enjoy again.